User Manual
Fixy Web
|
|
| Home |
| Working window of the system |
| File Menu |
| Reports Menu |
| "Information" Menu |
| Regions Menu |
| Groups Menu |
| Events Menu |
| Diary |
| Maps Menu |
Working window of the system
One of the most important options of the system is Route replay
Description of the main panels and buttons of the system
- Menu selection bar
- Information bar
- Vehicle search
- Group name
- Vehicle in a group and status data
- Connection status
- Route replay button
- Vehicle view button
- Exit from the system button
- Map control bar
- Panel for additional information on a selected vehicle
- Current status panel
- Current status bar
- Current user bar
- Number of vehicles in the selected group bar
- Map
-
Menu selection bar

-
Vehicle search by registration number

This option is very convenient for groups of more vehicles, where the vehicle numbers and status panel is not completely visible. In order to use it, enter a part of or the entire registration number of the vehicle you are looking for in the empty field, and then click on the magnifying glass. If you enter the entire registration number with all the symbols (letters and figures), the system will position you directly on it. If you enter a part of vehicle's registration number, the application will show you all the registration numbers, matching the symbols, you have entered.
-
Map control bar

This bar contains buttons for various map scales, on which the vehicles are visualized
- "Hand" button - you can use it to move the map in various directions
-
"Triangle" button - you can use this button to measure the straight-line distances. For example: if you want to measure the distance from point "А" to point "В", left-click on that button, then move on the map and select point "А", left-click on it an drag the mouse to point "В" and there release the mouse button. Then the information bar above the map will show you the measurement results in meters:

- The buttons for increasing/decreasing a certain section of the map are the last two buttons on the toolbar. If you want to see a detailed map of a selected city, you must left-click on the "magnifying glass" with a " + ", then move the cursor and left-click on the map again, until the desired scale is displayed. The button for decreasing a certain section of the map is used in the same way.
- "Arrow" button - reloading all vehicles.
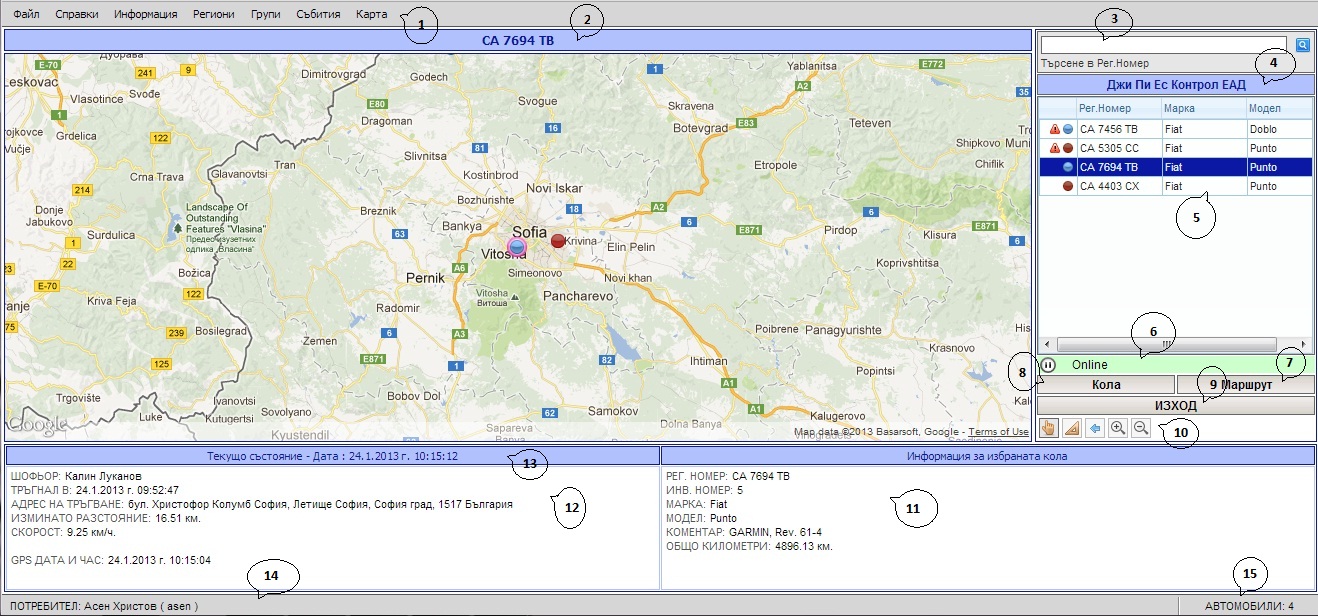
- Vehicle status
On the right-hand side of the screen you can find the window, from which you can see how many of the vehicles are in motion and how many are stopped in the moment. This information is provided by the color of the balls, next to vehicles' registration numbers
- A blue color in front of the registration number means that the vehicle is now in motion
- A black color in front of the registration number means that the vehicle is now stopped
- The dark red color in front of the registration number means that the vehicle has lost the GPS signal
- The grey color in front of the registration number means that the vehicle has lost the GPS connection
Apart from this window, you can see the vehicle status in a similar way on the map. If you, however, notice a prolonged absence of GPS signal or GSM network, please contact " GPS Control AD "
-
Connection status


These buttons show you the current status of the system connection
-
Real-time monitoring of the selected/all vehicles
In order to determine the status /motion or standstill/ of a specific vehicle, you must first select it by left-clicking on it in the vehicle status window, as the entire row will be colored blue. This color code is also used on the map, when you position a selected vehicle. For easier monitoring you can use the "All vehicles" button. When you see this message, this means that you are currently looking at all the vehilces on the map and their respective statuses. If you want to see only a certain vehicle, click on the "Vehicle" button and only the selected vehicle will be shown on the map. After you have already selected the vehicle, which you will monitor in the current panel status you will receive the following information if the vehicle is in motion: in the lower left corner of the active window, you will see information on the current status, which corresponds to the actual date and time; the current status panel contains information on the name of vehicle's driver (if your devices are driver-authorization devices, if the devices do not provide for driver authoriation, the system wull display – Unknown driver) in every panel you receive information on the starting date and time, the departure address, the distance travelled and the relevant spped, as of the moment of positioning .

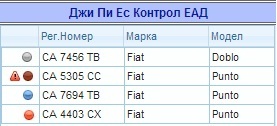
At the right-hand side of the screen you will see additional information on the vehicle of your choice - registration number, make, model, short comment, if entered in advance, and total mileage of the vehicle before the installation of the device.
-
Route replay

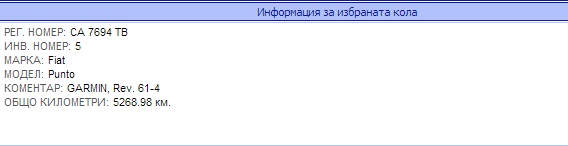
In order to replay an already taken route, you must first select a vehicle from the window of the registration numbers of the vehicles (to the right of the screen) and then click on the "Routes" button. After clicking on that button, an additional window will pop-up on the main screen, displaying information on all completed routes by the selected vehicles as of the current date .

To continue the route replay you must select one of the routes, shown on the panel. After you select the route, the screen displays the panel, showing information on who performed the route (driver name), departure time (DT), departure address, time of arrival (TA) and the address of arrival. These are the criteria, by which you can select the route to be replayed. For the route itself you will receive also additional information in the current route panel, which is located in the lower left corner of the active window and looks, as follows
Meanwhile, the color of the vehicle on the map is highlighted, which further suggests that you are in the route replay mode.
After you have selected the route, you must click on the replay button, which is located to the right of the screen in the replay panel

- the first button is for starting the replay
- the second button is for pausing the replay
- the third button is for stopping the replay and recommencing from the same position
If you want to completely stop the replay, rewind and fast-forward buttons (the double-arrow buttons).
After you have started the replay, the vehicle on the map starts moving, showing where the driver went through, when performing the route. On the right-hand side of the screen is the panel with current information on the route. There you can see the speed, date, time and distance travelled on the route. From the replay panel you can activate also the function for graphical display of the selected route. This can be done after left-clicking on the empty box in front of the "Track" inscription. After you have activated the drawing of the route on the map, the graphic, indicating the direction along the route should be displayed. The graphic visualization of the route may be activated also during replay. During route replay, you can also use the map control buttons. The panel with the route replay commands you can increase the replay speed. This function is usually used,, when the routes are longer and more time is required for their tracking. In order to save time, when replaying a longer route, you can increase the replay speed, by dragging the speed cursor to the right. Then, the index after the "speed" heading, which is currently set to 1, will change, depending on the desired route replay speed. The replay speed may be incresed and decreased also during replay. If you have finished replaying the routes and want to return to the real-time monitoring mode, choose the "Exit" button in the "Replay" panel